Macros
General
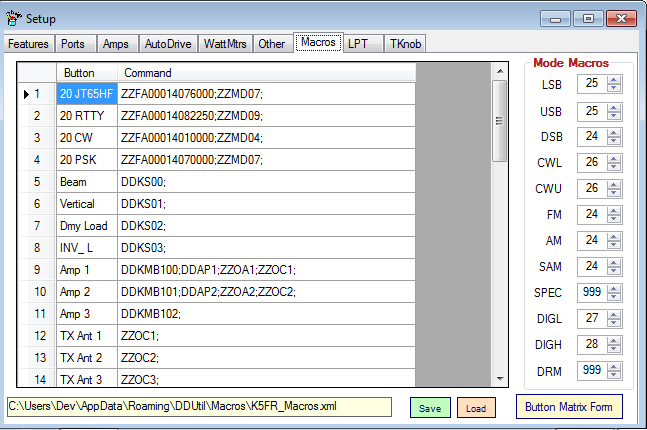
This tab is for configuring Macro commands used to instruct the radio and/or DDUtil to perform actions remotely. These actions can include setting almost any control or function on the radio console. Typically, commands might be attached to one of the macro buttons labeled FR Net (Flex Radio Net). These commands will; Change frequency to 14,319.000, Set Mode to USB, Set Transmit Profile to PR781+EQ, Set PA Power to 100 watts, Set RX Filter to 2.7K, etc.
The tab is divided into three areas.
- Data Grid → is the upper portion of the tab and is used to input the button names and command strings. Also, at the far left of each line is an M indicator that refers to the sequential number of the Macro button the line is assigned to.
- Data File → is at the bottom of the tab and is where the file name for a group of commands is designated. This group contains three controls to manage the data file.
- File Name → Name of the file containing the macro commands.
- Save Button → commits contents of the Data Grid to the file name in the File Name window. Use this feature to save the contents of the Data Grid after editing.
- Load Button → Opens a File Dialog window where a file is selected for loading and then the Data Grid is loaded with the commands in that file.
- Mode Macros → group is on the right edge of the tab. This group is available for defining macros to be executed when the radio mode changes.
- Note! Use macro number 999 to indicate no macro to execute..
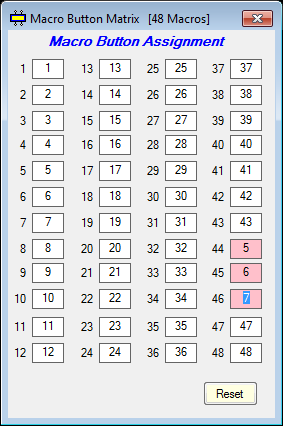
- Button Matrix Form → This button when pressed will display the following form.
Since up to 998 macros can be available to the user and only 48 macro buttons are available, this form allows reassignment of what macros are executed when a specific button is pressed. To reassign a macro button follow these steps;
- Click on the macro button to be reassigned.
- Type in the new macro number desired.
- Press either the [Enter] or {Tab] keys to complete the reassignment process.
- Notice macro buttons 44, 45 and 46 have been reassigned to macros 5, 6 and 7.
Pressing the Reset button will return all buttons to 1-48.
- Note! Loading a different Macro Data File will also reset any button reassignments.
Invoking Macros
Macros can be invoked in several ways depending on your needs.
- Pressing the F-Keys while DDUtil has focus.
- Using the Genovation remote key pad.
- Placing macros in the Band Data file.
- Placing macros in the Mode area of the Macros tab (see above).
- Using the Serial Macro Port to invoke macros.
- Using the Tuning Knob auxiliary buttons to invoke macros. Note: macros 30-38 only.
Commands
See the CAT page for the command reference.
Programming
For more information on setting up, programming and using Macro commands see the How To sections.

