Difference between revisions of "Sat"
From DDUtilV3
(→Operation) |
(→Calibration Window) |
||
| Line 58: | Line 58: | ||
* '''Red Button''' → Erases the '''ADIF''' file (use with caution). | * '''Red Button''' → Erases the '''ADIF''' file (use with caution). | ||
* '''Log''' → Enters QSO contact data to either '''DXKeeper''' or the '''ADIF''' file depending on the log selection setting in '''DDUtil's Other''' tab. | * '''Log''' → Enters QSO contact data to either '''DXKeeper''' or the '''ADIF''' file depending on the log selection setting in '''DDUtil's Other''' tab. | ||
| − | ===<span style="color: | + | ===<span style="color:green">Calibration Window</span>=== |
[[Image:SatCalib.jpg]]<br> | [[Image:SatCalib.jpg]]<br> | ||
====Controls==== | ====Controls==== | ||
Revision as of 17:32, 28 June 2016
Contents
Purpose
The purpose of this feature is to allow users the ability to automate control of LEO (Low Earth Orbiting) satellites while connected to a F6K radio (6500 or 6700).
Requirements
Software
- SatPC32 is required to obtain satellite name, frequency data and rotor tracking ability.
- QRZ.com XML subscription if QSO partner data retrieval is desired.
- DXLab's DXKeeper logging program if auto logging is desired.
Hardware
- 2m & 70cm transverters.
Setup
SatPC32 Setup
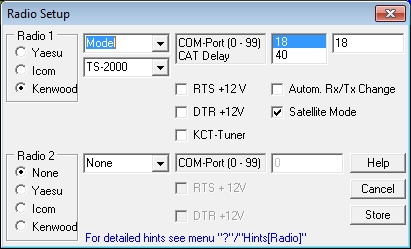
- Select Setup | Radio Setup
- In the Radio #1 group
- Select Kenwood for the radio type and Model = TS-2000.
- Select one end of a virtual serial port pair where the other end connects to DDUtil's Sat setup port.
- Note: See the DDUtil Setup item below.
- In the Radio #2 group select None (DDUtil takes care of the transmit frequency).
- In the Radio #1 group
- Select Setup | Rotor Setup and setup your Az/Elev rotor as required.
SSDR Setup
- A Global Profile is required for each satellite you want to work. These profiles control all the parameters of the radio for a specific satellite as follows:
- 2 Panadapters with one slice each as follows:
- Panadapter 1 is for Slice A and is always the receive slice.
- Panadapter 2 is for Slice B and is always the transmit slice.
- Profile names must be prefixed with SAT followed by the satellite name so the profile name would be SATFO-29 for satellite FO-29.
- Sample profiles are available here.
- 2 Panadapters with one slice each as follows:
- An XVTR setup is required for each transverter (Settings menu | Radio Setup | XVTR tab).
- Note: see the SmartSDR Software-Users-Guide for configuration details.
DDUtil Setup
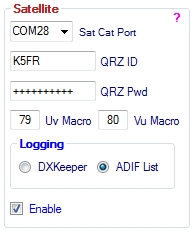
Open the Settings form and select the Other tab and go to the Satellite group.
- Select one end of a virtual serial port pair for SatPC32.
- Enter the QRZ.com ID and Password if you want to be able to lookup call signs.
- Enter UHF and VHF macros if used.
- Select whether you want to use DXKeeper or an ADIF file for logging QSOs.
Operation
DDUtil Runtime Window
Controls
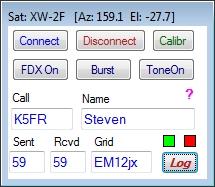
- Connect/Disconnect → Connect or Disconnect from the SatPC32 program.
- Calibr → Displays the calibration form.
- FDX On → Toggles the SSDR FDX (Full Duplex) feature On/Off.
- Burst → Sends a two (2) second 74.4 Hz tone to satellite SO-50 to activate its timer.
- Tone On → Press this button to work around a SSDR profile bug where the CTCSS TX is not persisted for FM satellites.
- Call → Enter call of QSO partner and press the Tab key to lookup call details. Note: requires a QRZ.com XML Data subscription account. Note: Double-clicking the call window will cleare call, name and grid info.
- Name → Name of QSO partner. Note: Double-clicking the name window will clear name.
- Sent/Rcvd → Sent and Received signal reports to be entered into the log. Note: program defaults to 59.
- Grid → Grid square of QSO partner. Note: Double-clicking the grid window will clear the grid.
- Green Button → Displays the ADIF log file.
- Red Button → Erases the ADIF file (use with caution).
- Log → Enters QSO contact data to either DXKeeper or the ADIF file depending on the log selection setting in DDUtil's Other tab.
Calibration Window
Controls
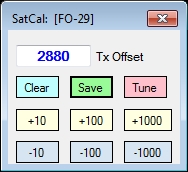
- Tx Offset &rrar; Shows the last entered offset frequency. Note: this value can be saved by pressing the Save button.
- Clear → sets the Tx Offset to zero.
- Save → Saves the Tx Offset value to memory by satellite and is recalled when next the satellite is called up.
- Tune → Pressing this button initiates the Flex SSDR Tune function. Pressing the button again will turn off the Tune function.
- +/- Controls → Pressing these controls will increase/decrease the Tx Offset frequency by the number of Hz shown on the button that is pushed. Note: this works the same as the tune buttons in SatPC32, see special notes below.
Special Notes:
- If you use the Calibrate feature described above DO NOT use the calibrate feature in SatPC32 as the two numbers will interact and cause problems. Set the SatPC32 Cat Tuning Up/Down Calibrate values to zero or blank.
Notes
- The satellite feature is only available for Flex 6K (6500/6700) users.
- Control explanations are available by hovering the cursor over the control of interest.


