Difference between revisions of "Sat"
From DDUtilV3
(→Controls) |
(→Calibration Window) |
||
| (2 intermediate revisions by the same user not shown) | |||
| Line 47: | Line 47: | ||
====Controls==== | ====Controls==== | ||
* '''Connect/Disconnect''' → Connect or Disconnect from the '''SatPC32''' program. | * '''Connect/Disconnect''' → Connect or Disconnect from the '''SatPC32''' program. | ||
| − | * '''Calibr''' → Displays the calibration form. | + | * '''Calibr''' → Displays the calibration form. '''Note:''' see the '''Calibrate Window''' section below. |
* '''FDX On''' → Toggles the SSDR '''FDX''' (Full Duplex) feature On/Off. | * '''FDX On''' → Toggles the SSDR '''FDX''' (Full Duplex) feature On/Off. | ||
* '''Burst''' → Sends a two (2) second 74.4 Hz tone to satellite '''SO-50''' to activate its timer. | * '''Burst''' → Sends a two (2) second 74.4 Hz tone to satellite '''SO-50''' to activate its timer. | ||
| Line 60: | Line 60: | ||
===<span style="color:blue">Calibration Window</span>=== | ===<span style="color:blue">Calibration Window</span>=== | ||
| − | [[Image:SatCalib.jpg]] | + | [[Image:SatCalib.jpg]] |
| + | ====Overview==== | ||
| + | In order to work CW or SSB through a Linear satellite your transmit frequency needs to be adjusted/calibrated fairly accurately to the satellite's input frequency. This adjustment is required because of the '''Doppler Shift''' of the frequency caused by the speed that the satellite is moving. This form allows for the input frequency to be calibrated to adjust for the '''Doppler Shift'''. | ||
| + | |||
====Controls==== | ====Controls==== | ||
| − | * '''Tx Offset''' & | + | * '''Tx Offset''' → Shows the last entered offset frequency. '''Note:''' this value can be saved by pressing the '''Save''' button. |
* '''Clear''' → sets the Tx Offset to zero. | * '''Clear''' → sets the Tx Offset to zero. | ||
* '''Save''' → Saves the Tx Offset value to memory by satellite and is recalled when next the satellite is called up. | * '''Save''' → Saves the Tx Offset value to memory by satellite and is recalled when next the satellite is called up. | ||
| Line 69: | Line 72: | ||
=====Special Notes:===== | =====Special Notes:===== | ||
| − | # If you use the '''Calibrate''' feature described above '''DO NOT''' use the calibrate feature in '''SatPC32''' as the two numbers will interact and cause problems. Set the '''SatPC32 Cat Tuning Up/Down Calibrate''' values to zero or blank. | + | # If you use the '''DDUtil Calibrate''' feature described above '''DO NOT''' use the calibrate feature in '''SatPC32''' as the two numbers will interact and cause problems. Set the '''SatPC32 Cat Tuning Up/Down Calibrate''' values to zero or blank. |
==Notes== | ==Notes== | ||
# The satellite feature is only available for Flex 6K (6500/6700) users. | # The satellite feature is only available for Flex 6K (6500/6700) users. | ||
# Control explanations are available by hovering the cursor over the control of interest. | # Control explanations are available by hovering the cursor over the control of interest. | ||
Latest revision as of 17:55, 28 June 2016
Contents
Purpose
The purpose of this feature is to allow users the ability to automate control of LEO (Low Earth Orbiting) satellites while connected to a F6K radio (6500 or 6700).
Requirements
Software
- SatPC32 is required to obtain satellite name, frequency data and rotor tracking ability.
- QRZ.com XML subscription if QSO partner data retrieval is desired.
- DXLab's DXKeeper logging program if auto logging is desired.
Hardware
- 2m & 70cm transverters.
Setup
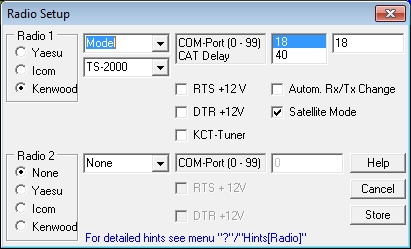
SatPC32 Setup
- Select Setup | Radio Setup
- In the Radio #1 group
- Select Kenwood for the radio type and Model = TS-2000.
- Select one end of a virtual serial port pair where the other end connects to DDUtil's Sat setup port.
- Note: See the DDUtil Setup item below.
- In the Radio #2 group select None (DDUtil takes care of the transmit frequency).
- In the Radio #1 group
- Select Setup | Rotor Setup and setup your Az/Elev rotor as required.
SSDR Setup
- A Global Profile is required for each satellite you want to work. These profiles control all the parameters of the radio for a specific satellite as follows:
- 2 Panadapters with one slice each as follows:
- Panadapter 1 is for Slice A and is always the receive slice.
- Panadapter 2 is for Slice B and is always the transmit slice.
- Profile names must be prefixed with SAT followed by the satellite name so the profile name would be SATFO-29 for satellite FO-29.
- Sample profiles are available here.
- 2 Panadapters with one slice each as follows:
- An XVTR setup is required for each transverter (Settings menu | Radio Setup | XVTR tab).
- Note: see the SmartSDR Software-Users-Guide for configuration details.
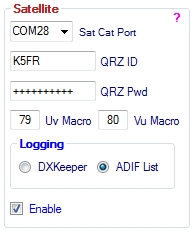
DDUtil Setup
Open the Settings form and select the Other tab and go to the Satellite group.
- Select one end of a virtual serial port pair for SatPC32.
- Enter the QRZ.com ID and Password if you want to be able to lookup call signs.
- Enter UHF and VHF macros if used.
- Select whether you want to use DXKeeper or an ADIF file for logging QSOs.
Operation
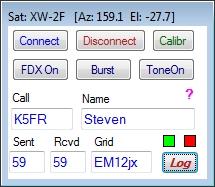
DDUtil Runtime Window
Controls
- Connect/Disconnect → Connect or Disconnect from the SatPC32 program.
- Calibr → Displays the calibration form. Note: see the Calibrate Window section below.
- FDX On → Toggles the SSDR FDX (Full Duplex) feature On/Off.
- Burst → Sends a two (2) second 74.4 Hz tone to satellite SO-50 to activate its timer.
- Tone On → Press this button to work around a SSDR profile bug where the CTCSS TX is not persisted for FM satellites.
- Call → Enter call of QSO partner and press the Tab key to lookup call details. Note: requires a QRZ.com XML Data subscription account. Note: Double-clicking the call window will cleare call, name and grid info.
- Name → Name of QSO partner. Note: Double-clicking the name window will clear name.
- Sent/Rcvd → Sent and Received signal reports to be entered into the log. Note: program defaults to 59.
- Grid → Grid square of QSO partner. Note: Double-clicking the grid window will clear the grid.
- Green Button → Displays the ADIF log file.
- Red Button → Erases the ADIF file (use with caution).
- Log → Enters QSO contact data to either DXKeeper or an ADIF file depending on the log selection setting in DDUtil's Other tab.
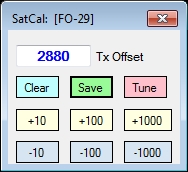
Calibration Window
Overview
In order to work CW or SSB through a Linear satellite your transmit frequency needs to be adjusted/calibrated fairly accurately to the satellite's input frequency. This adjustment is required because of the Doppler Shift of the frequency caused by the speed that the satellite is moving. This form allows for the input frequency to be calibrated to adjust for the Doppler Shift.
Controls
- Tx Offset → Shows the last entered offset frequency. Note: this value can be saved by pressing the Save button.
- Clear → sets the Tx Offset to zero.
- Save → Saves the Tx Offset value to memory by satellite and is recalled when next the satellite is called up.
- Tune → Pressing this button initiates the Flex SSDR Tune function. Pressing the button again will turn off the Tune function.
- +/- Buttons → Pressing these controls will increase/decrease the Tx Offset frequency by the number of Hz shown on the button that is pushed. Note: this works the same as the tune buttons in SatPC32, see special notes below.
Special Notes:
- If you use the DDUtil Calibrate feature described above DO NOT use the calibrate feature in SatPC32 as the two numbers will interact and cause problems. Set the SatPC32 Cat Tuning Up/Down Calibrate values to zero or blank.
Notes
- The satellite feature is only available for Flex 6K (6500/6700) users.
- Control explanations are available by hovering the cursor over the control of interest.


