Difference between revisions of "Docking Windows"
| Line 3: | Line 3: | ||
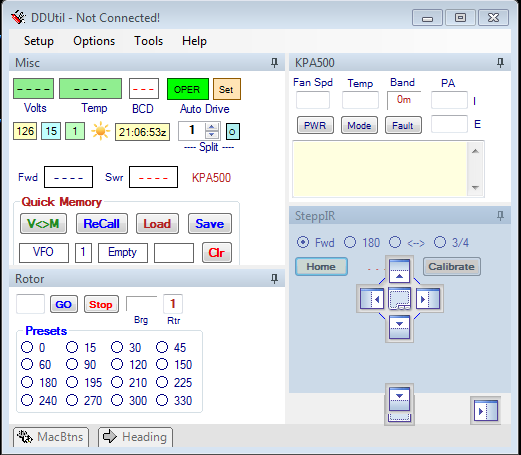
The '''Docking Compass''' tool is designed to work together with re-sizing of the main screen to make the best possible use of screen real estate. This is a tool designed to make positioning and re-positioning and re-arranging screens on the '''[[GUI|Docking Screen]]''' quick and easy. But, it does take a little practice to get used to it. Don’t worry just because a screen seems to go away, it is still there, it just needs to be re-positioned. If you place the mouse pointer on the title bar of a screen and left click on it and hold the mouse button you can drag the screen around the main screen. As you drag it around you will see one or more four point “compass” points appear depending on how many feature screens exist, if you drag the screen over a compass and place the mouse pointer over the compass direction pointer and release the mouse button the screen will automatically “dock” in the direction that the pointer indicates. If this is not where you wanted it to go then it can easily be re-positioned. If necessary it will displace an existing screen to another area to accommodate your instruction. | The '''Docking Compass''' tool is designed to work together with re-sizing of the main screen to make the best possible use of screen real estate. This is a tool designed to make positioning and re-positioning and re-arranging screens on the '''[[GUI|Docking Screen]]''' quick and easy. But, it does take a little practice to get used to it. Don’t worry just because a screen seems to go away, it is still there, it just needs to be re-positioned. If you place the mouse pointer on the title bar of a screen and left click on it and hold the mouse button you can drag the screen around the main screen. As you drag it around you will see one or more four point “compass” points appear depending on how many feature screens exist, if you drag the screen over a compass and place the mouse pointer over the compass direction pointer and release the mouse button the screen will automatically “dock” in the direction that the pointer indicates. If this is not where you wanted it to go then it can easily be re-positioned. If necessary it will displace an existing screen to another area to accommodate your instruction. | ||
| + | |||
| + | [[image:GUIdocking.png]] | ||
| + | Docking Compass | ||
==Docking== | ==Docking== | ||
Revision as of 15:32, 16 March 2013
General
All windows dock on one of four (4) borders of the associated window the cursor is hovered over or adjacent to an existing window already on the form. There are three (3) ways to dock a window.
The Docking Compass tool is designed to work together with re-sizing of the main screen to make the best possible use of screen real estate. This is a tool designed to make positioning and re-positioning and re-arranging screens on the Docking Screen quick and easy. But, it does take a little practice to get used to it. Don’t worry just because a screen seems to go away, it is still there, it just needs to be re-positioned. If you place the mouse pointer on the title bar of a screen and left click on it and hold the mouse button you can drag the screen around the main screen. As you drag it around you will see one or more four point “compass” points appear depending on how many feature screens exist, if you drag the screen over a compass and place the mouse pointer over the compass direction pointer and release the mouse button the screen will automatically “dock” in the direction that the pointer indicates. If this is not where you wanted it to go then it can easily be re-positioned. If necessary it will displace an existing screen to another area to accommodate your instruction.
Docking
- Select a feature or option from the Setup form. A window will be created either on the Docking Screen or on the desktop.
- Left-Click on the subject window's Title Bar and drag it over the DDUtil form.
- A four (4) pointed Docking Compass will appear showing which side of the window the dock will be applied to.
- Choose the appropriate side of the container window or an existing window and release the left mouse button.
- Pinned → the window is open on the container form.
- Do nothing, this is the default mode when a window is docked.
- Un-Pinned → the window is collasped to one of the margins.
- On the title bar (right end) press the Pin symbol.
- The window will collaspe to the docked margin.
- Tabbed → the window is docked internally to one of the existing windows.
- There is also a button in the middle of the docking diamond. If this button is selected the form will be a tabbed window including the window where the docking diamond was located.
- The first window won't have a tab until a second window is docked on top of it.
Moving
Any window can be moved from it's current position to the desktop or to any other position in the DDUtil container window.
- Note! The window to be moved must be Un-Pinned before it can be moved.
- Left-Click on the subject window's Title Bar and drag it to the new position.
