Difference between revisions of "Features"
From DDUtilV3
(→Aux Display Panes) |
(→USB 8 Relay Board) |
||
| Line 44: | Line 44: | ||
==USB 8 Relay Board== | ==USB 8 Relay Board== | ||
| + | Use this relay board to switch antennas or other ancillary equipment. | ||
| + | |||
* '''Enable''' → Select to enable the '''[http://denkovi.com/productv/31/usb-eight-channel-relay-board-for-automation-12v.html Denkovi USB 8 Relay Board]''' | * '''Enable''' → Select to enable the '''[http://denkovi.com/productv/31/usb-eight-channel-relay-board-for-automation-12v.html Denkovi USB 8 Relay Board]''' | ||
| + | |||
| + | * '''Disable Band Data''' Selecting this check box will disable auto band following for the USB8. | ||
| + | |||
* '''Band Boxes''' → Enter a decimal number for each band you want the board to activate a relay for. Entering the following numbers produces: | * '''Band Boxes''' → Enter a decimal number for each band you want the board to activate a relay for. Entering the following numbers produces: | ||
:1 = Relay 1 activated | :1 = Relay 1 activated | ||
| Line 52: | Line 57: | ||
:255 = All relays activated | :255 = All relays activated | ||
| − | :''' | + | :'''Notes:''' |
| + | # Relays are activated in '''[[Glossary#Binary-Coded Decimal|Binary]]''' notation (00000111) = 7. | ||
| + | # See the [[CAT#DDUtil_Command_Reference|'''Macro''']] command '''DDRB''' for additional programming information for this board. | ||
Revision as of 18:06, 21 July 2013
General
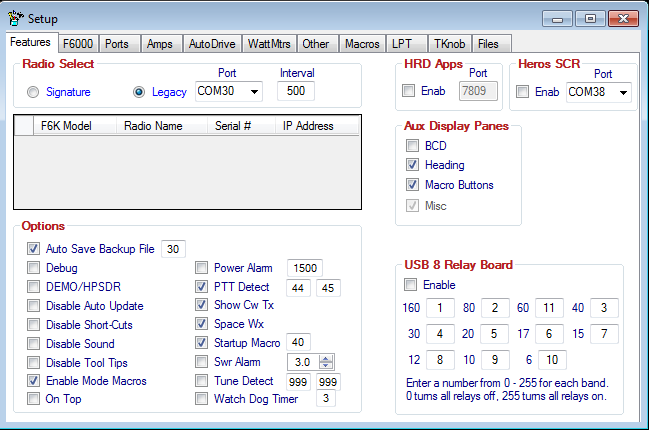
The Features tab of the Setup form is used to select what features will be used and/or displayed on the Main DDUtil form.
Radio Select
- Legacy → Select to connect to a legacy radio.
- Signature → Select to connect to a 6000 series radio.
HRD Apps
- Enable → Select to enable the HRD TCP/IP server.
- Port → The HRD predefined port number (fixed).
Heros
- Enable → Select to enable the Heros SCR Preselector.
- Port → Select the serial port to connect Heros to the PC.
Aux Display
Selecting any of these items will add a window to the Main Form.
- BCD → Displays the BCD form in the main GUI.
- Heading → Displays the Rotor Heading form in the main GUI.
- Macro Buttons → Displays the Macros Button form in the main GUI.
- Misc → Displays the Miscellaneous form in the main GUI.
- Note: The Misc form is mandatory and not optional.
Options
- Auto Save Backup File → When selected will save a time stamped copy of the user settings file to the %APPDATA%\DDUtilV3\Backup folder for the number of days shown in the window to the immediate right before being deleted.
- Debug → Enables enhanced error log reporting.
- Demo/HPSDR → When selected allows DDUtil to operate with Flex Demo mode and the HPSDR radios.
- Disable Auto Update → When selected will disable automatic checking for a new DDUtil version at start up.
- Disable Shortcuts → When selected will disable using the short cut keys.
- Disable Sound → When selected turns off the sound associated with pop-up messages.
- Disable Tool Tips → When selected will disable pop →up tool tips when the cursor is hovered over a control.
- Enable Mode Macros → When selected allows interoperability with the mode change macros.
- On Top → When selected forces the DDUtil main form to stay on top of all other forms.
- Power Alarm → When selected will disable the radio's transmit ability if the power shown in the adjacent window is exceeded.
- Show Cw Tx → When selected shows the CW TX filter on the panadapter when in CW and Split transmit mode.
- Space Wx → When selected will display the Solar Flux, A & K indexes on the Main GUI Misc panel.
- Startup Macro → When selected will execute the macro listed in the adjacent window when DDUtil starts.
- Swr Alarm → When selected will disable the radio's transmit ability if the SWR shown in the adjacent window is exceeded. Note: this feature requires either a supported watt meter or a supported amplifier for this feature to work.
- Tune Detect → When selected the adjacent macros will execute when the radio Tune mode starts and stops.
- Watch Dog Timer → When selected will disable the radio's transmit ability if the time shown in the adjacent window is exceeded.
USB 8 Relay Board
Use this relay board to switch antennas or other ancillary equipment.
- Enable → Select to enable the Denkovi USB 8 Relay Board
- Disable Band Data Selecting this check box will disable auto band following for the USB8.
- Band Boxes → Enter a decimal number for each band you want the board to activate a relay for. Entering the following numbers produces:
- 1 = Relay 1 activated
- 2 = Relay 2 activated
- 3 = Relays 1 & 2 activated
- 7 = Relays 1, 2 & 3 activated
- 255 = All relays activated
- Notes:
